1.前言 #
我们首先来gdb调试一下这个程序
// main.go
package main

import "fmt"

// the function's body is empty
func add(x, y int64) int64

func main() {
    gg:=add(2, 3)
    fmt.Println(gg)
}

// add_amd.s
TEXT ·add(SB),$0-24
	MOVQ x+0(FP), BX
	MOVQ y+8(FP), BP
	ADDQ BP, BX
	MOVQ BX, ret+16(FP)
	RET
编译一下源代码: go build -gcflags "-N -l" -o test .
2.程序加载到内存入口 #
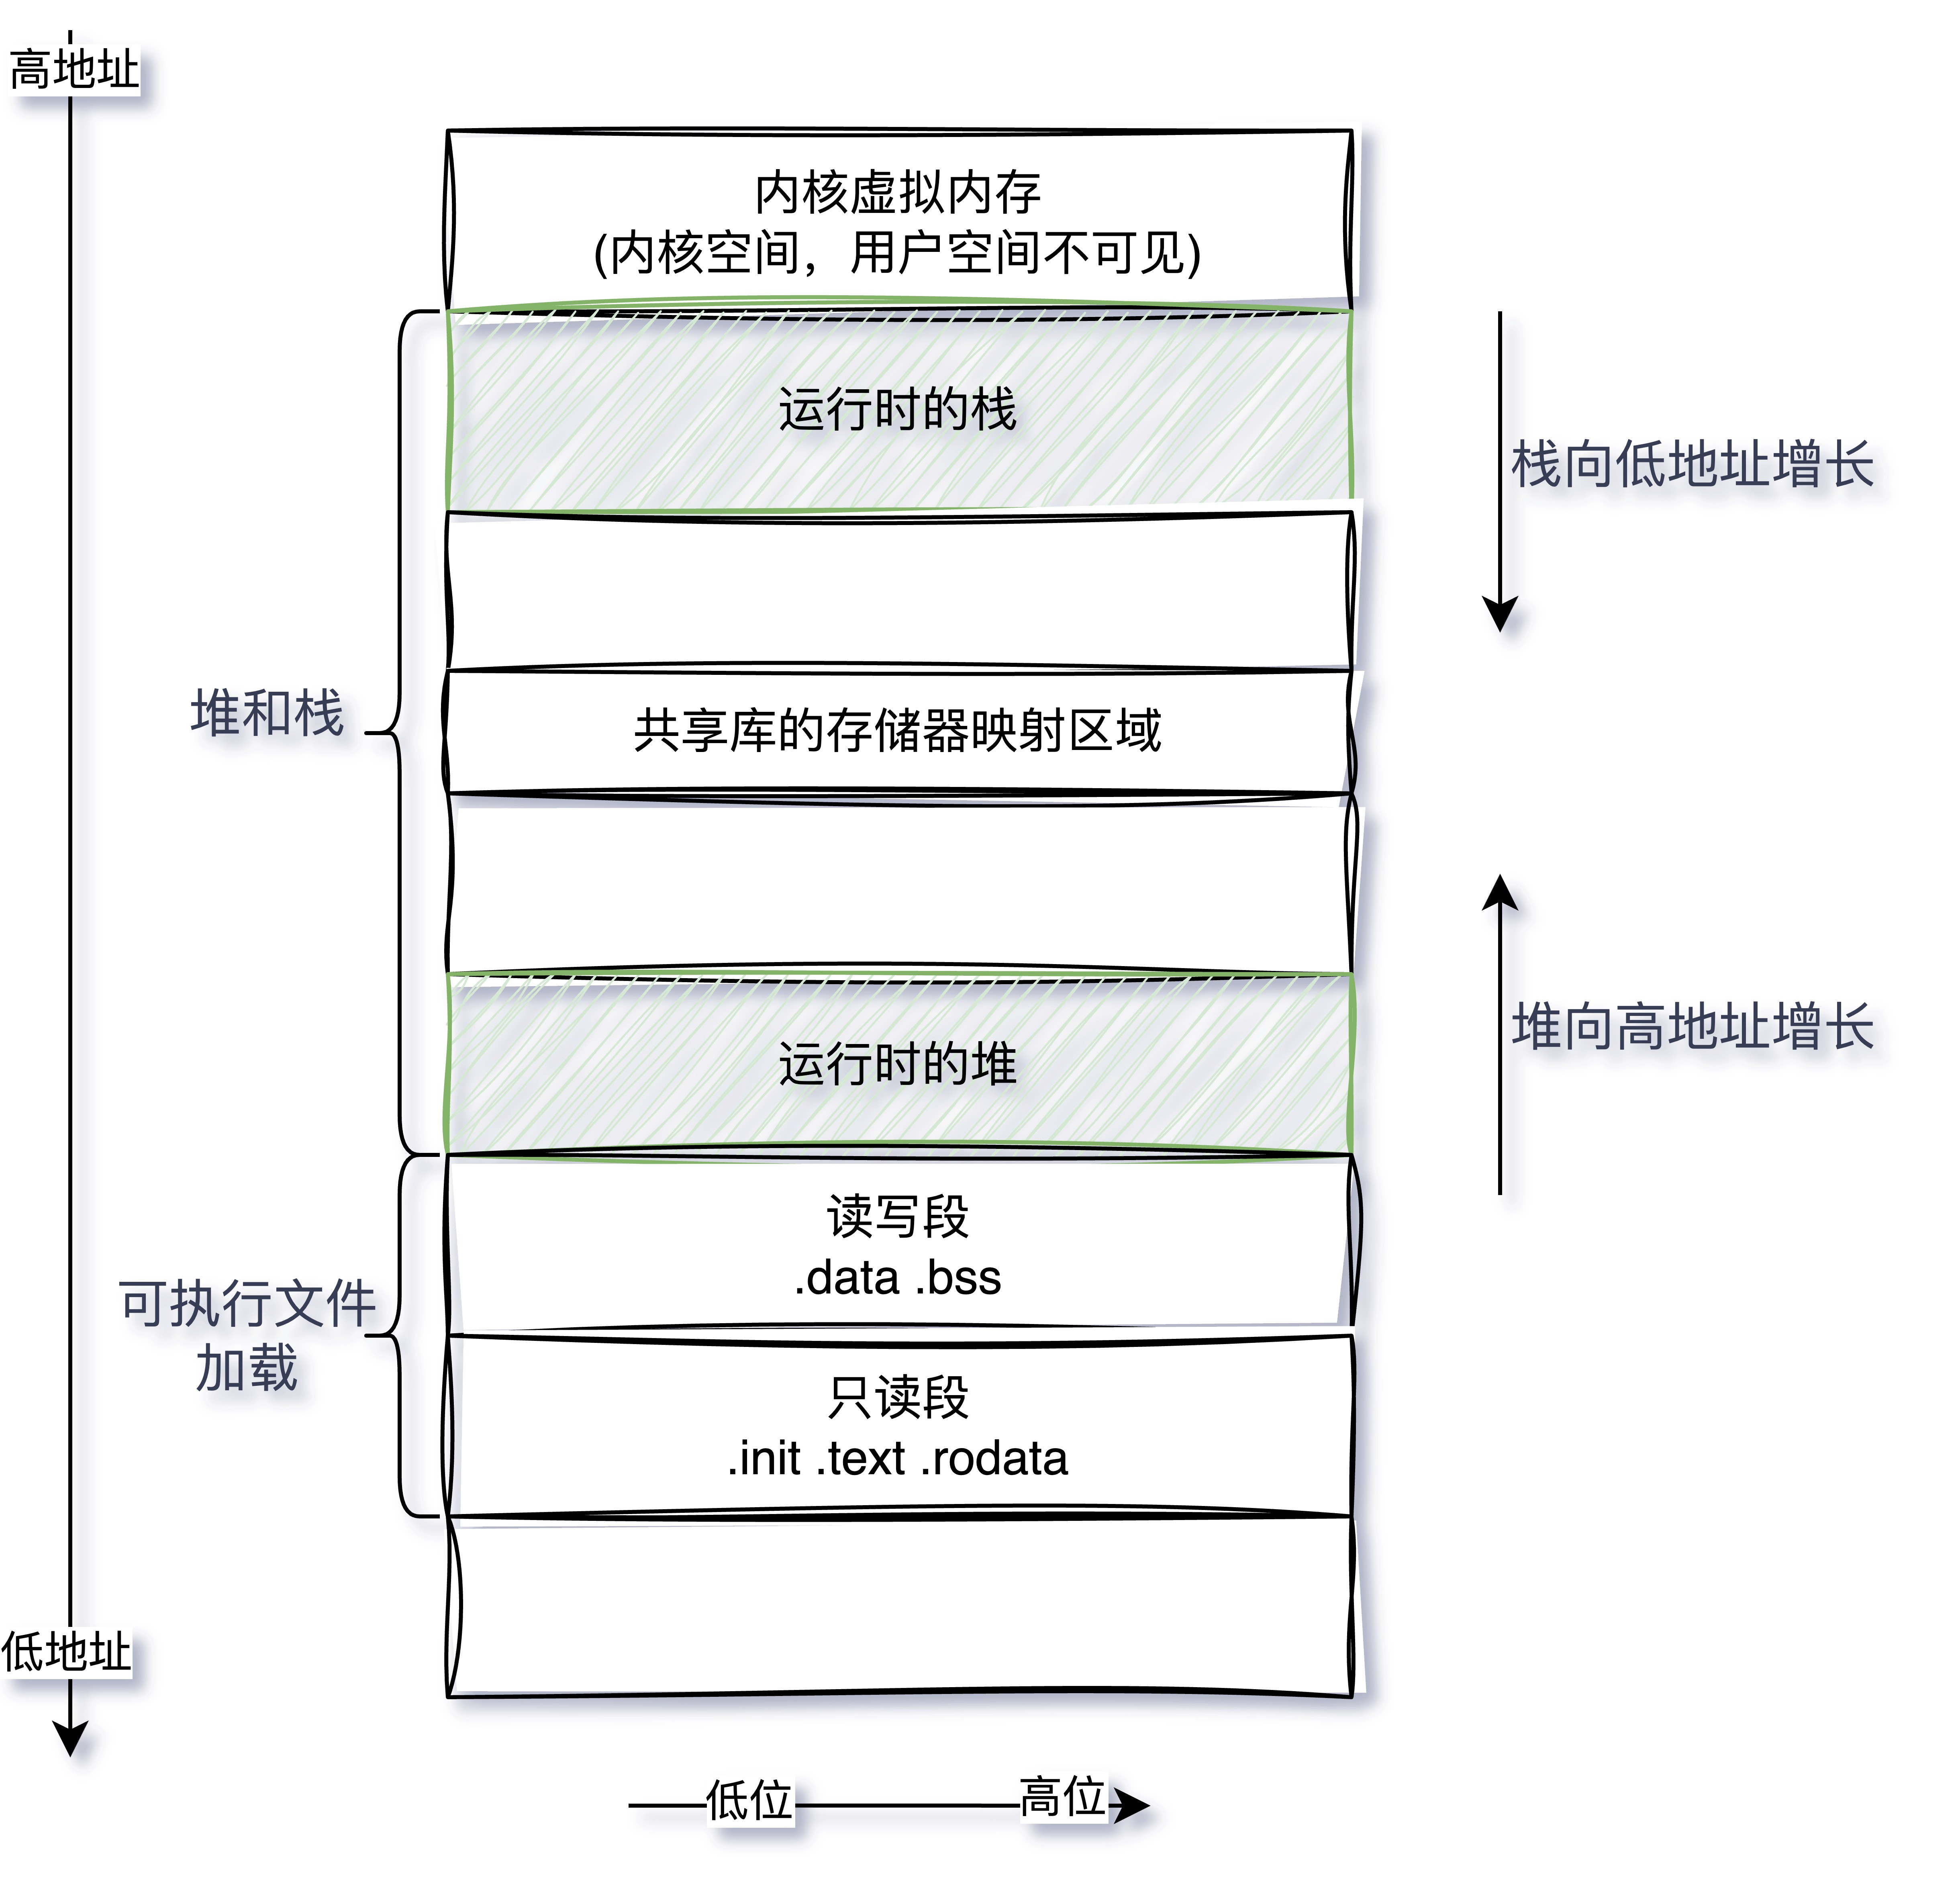
从上面的调试来看,最终到到达了src/runtime/asm_amd64.s的runtime.rt0_go函数,其执行顺序如下:
- file(/usr/lib/golang/src/runtime/rt0_linux_amd64.s:8)
- _rt0_amd64_linux()(/usr/lib/golang/src/runtime/rt0_linux_amd64.s:8)
- runtime.rt0_go()(/usr/lib/golang/src/runtime/asm_amd64.s:89)
3.rt0_go函数进行初始化全局变量 #
主要是rt0_go函数
TEXT runtime·rt0_go(SB),NOSPLIT,$0
// 1.初始化全局变量g0
// 2.m0和g0绑定在一起
// 3.设置nCPU/M/P的个数,初始化m0,allp
// 4.创建main goroutine
// 5.开始M
3.1.初始化全局变量g0 #
TEXT runtime·rt0_go(SB),NOSPLIT,$0
//...
// 1.初始化全局变量g0
    MOVQ	$runtime·g0(SB), DI     //全局的变量g0的地址放入DI寄存器
    // 始初始化全局变量g0, g0的栈大约有64K,地址范围为 SP - 64*1024 + 104 ~ SP
    LEAQ	(-64*1024+104)(SP), BX
    MOVQ	BX, g_stackguard0(DI)
    MOVQ	BX, g_stackguard1(DI)
    MOVQ	BX, (g_stack+stack_lo)(DI)
    MOVQ	SP, (g_stack+stack_hi)(DI)
    //...
    LEAQ	runtime·m0+m_tls(SB), DI //DI = &m0.tls,取m0的tls成员的地址到DI寄存器
    CALL	runtime·settls(SB)       //调用settls设置线程本地存储,其中settls的入参为DI寄存器
    get_tls(BX)                      //把TLS地址放入BX寄存器,测试刚刚那个绑定是否成功。
    MOVQ	$0x123, g(BX)
    MOVQ	runtime·m0+m_tls(SB), AX
    CMPQ	AX, $0x123
    JEQ 2(PC)
    CALL	runtime·abort(SB)
// 2.m0和g0绑定在一起
//...
// 3.设置nCPU/M/P的个数,初始化m0,allp
//...
// 4.创建main goroutine
//...
// 5.开始M
// ...
关于runtime.settles函数,可以看下前文<类汇编.tls相关函数>一节
3.2.m0和g0绑定在一起 #
我们继续下面的runtime·rt0_go函数.
TEXT runtime·rt0_go(SB),NOSPLIT,$0
//...
// 1.初始化全局变量g0
//...
// 2.m0和g0绑定在一起
ok:
    get_tls(BX)
    LEAQ	runtime·g0(SB), CX //取的g0的在堆上的地址放入CX-->CX = g0的地址
    MOVQ	CX, g(BX)          //把g0的地址保存在线程本地存储里面,也就是*TLS=&g0 --> m0.tls[0]=&g0
    LEAQ	runtime·m0(SB), AX //AX=&m0

    MOVQ	CX, m_g0(AX)       // save m->g0 = g0
    MOVQ	AX, g_m(CX)        // save m0 to g0->m
// 3.设置nCPU/M/P的个数,初始化m0,allp
//...
// 4.创建main goroutine
//...
// 5.开始M
// ...
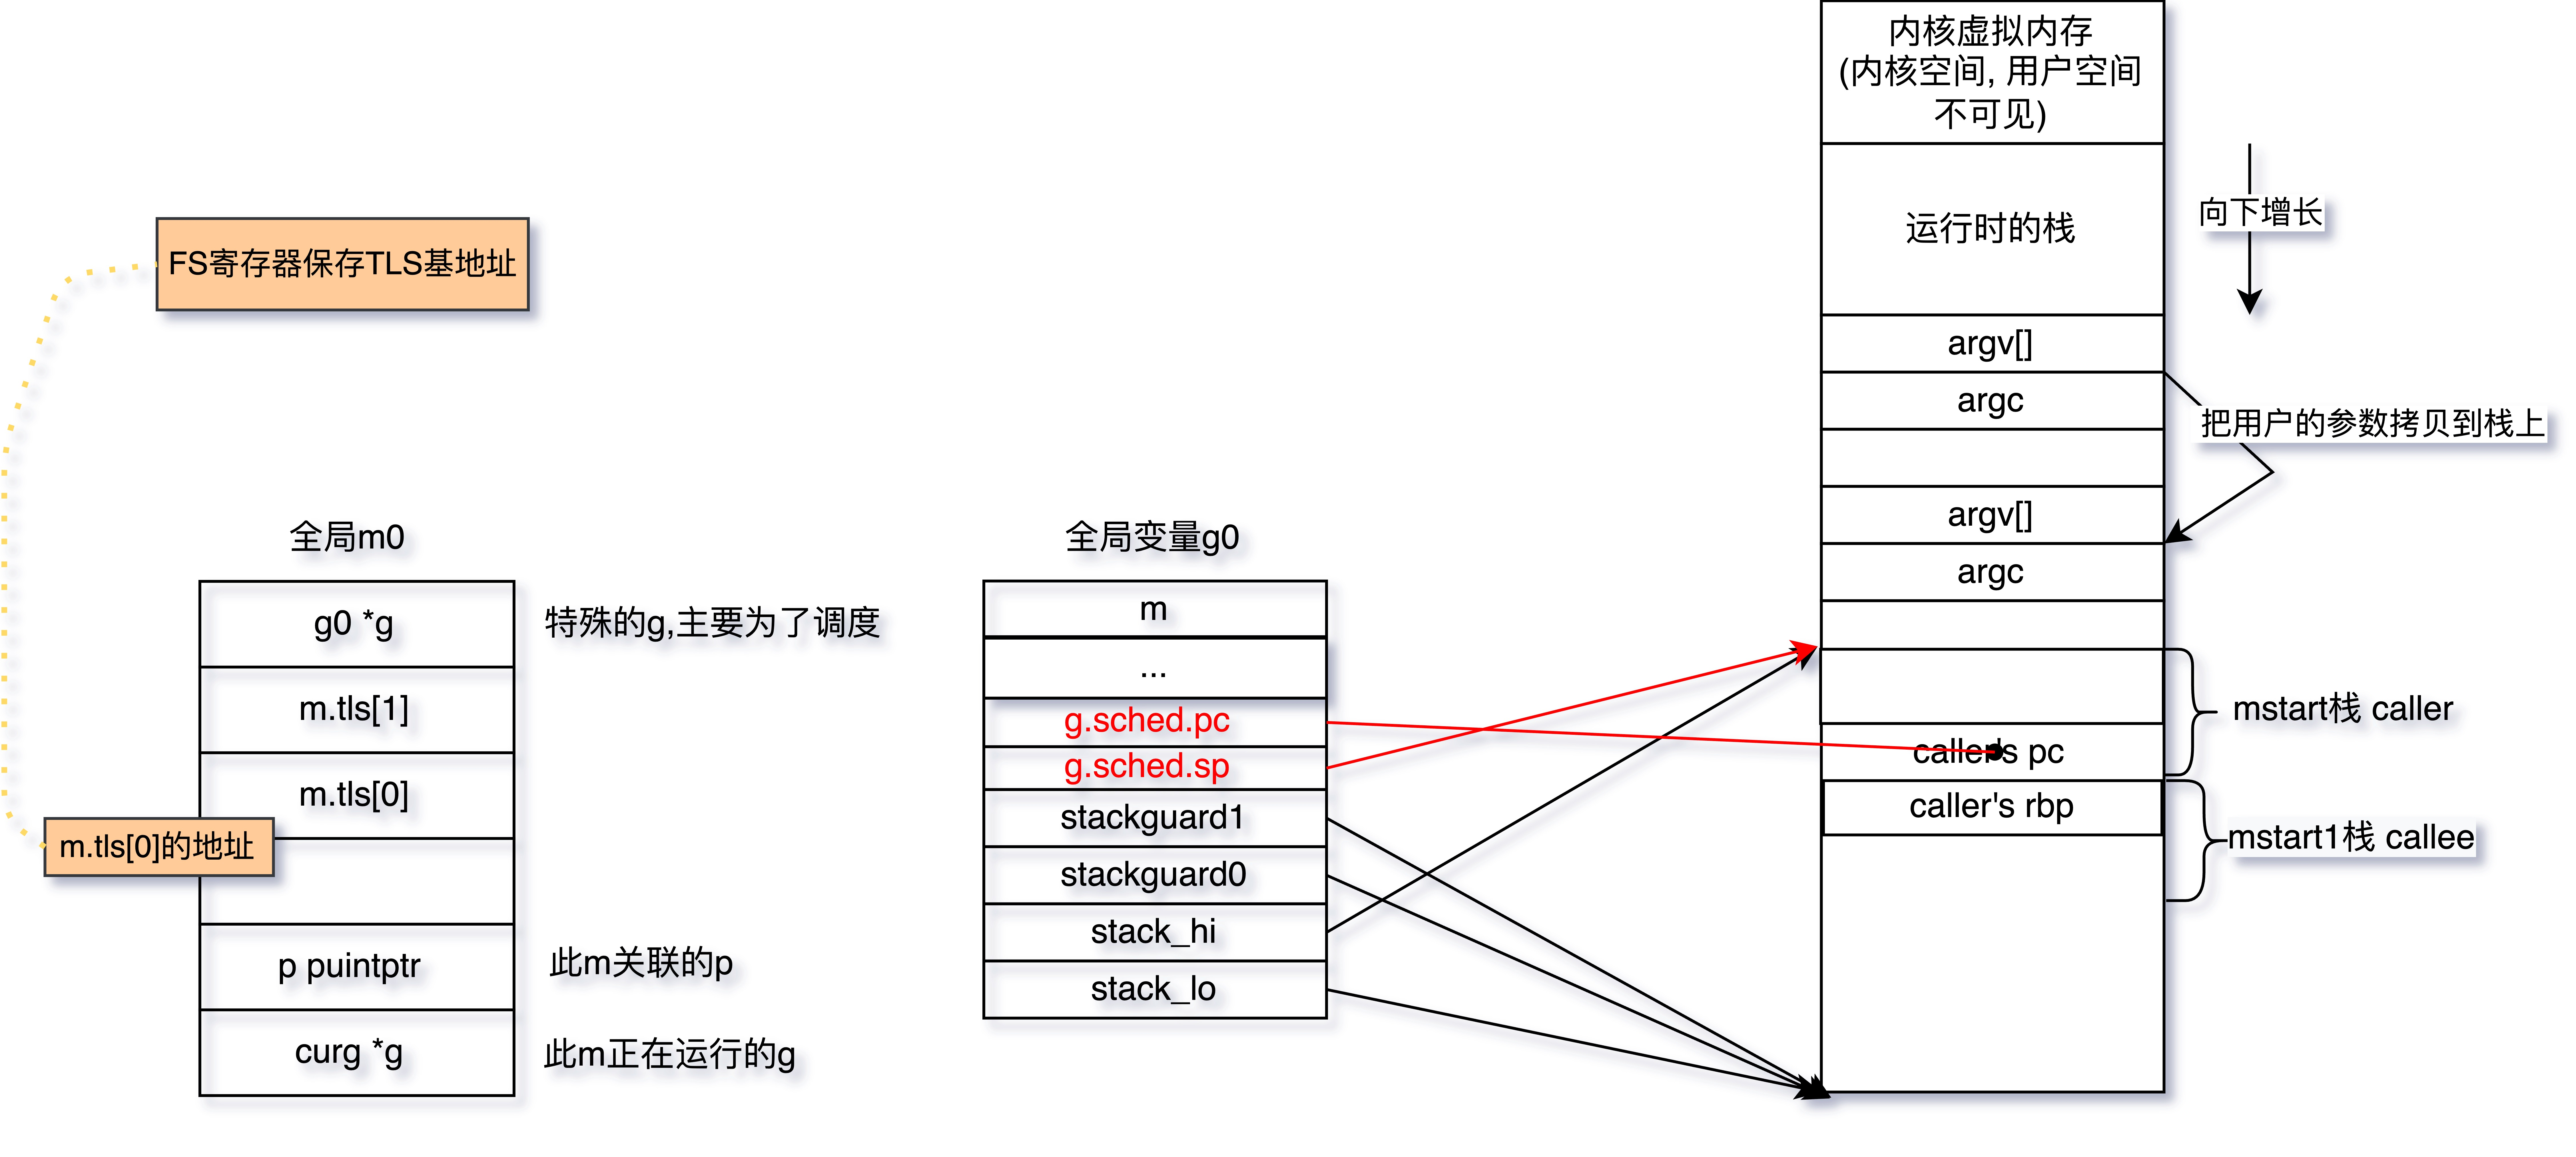
把m0和g0绑定在一起,之后在main线程中通过get_tls可以获取到g0,通过g0的m成员又可以找到m0,就可实现了m0和g0与main线程之间的关联。
从这里还可以看到,保存在main线程本地存储(TLS)中的值是g0的地址,其为指向g的指针而不是指向m的指针。
3.3.设置nCPU/M/P的个数,初始化m0,allp #
我们继续下面的runtime·rt0_go函数.
TEXT runtime·rt0_go(SB),NOSPLIT,$0
//...
// 1.初始化全局变量g0
//...
// 2.m0和g0绑定在一起
//...
// 3.设置nCPU/M/P的个数,初始化m0,allp
    MOVL	16(SP), AX         // copy argc; AX=argc
    MOVL	AX, 0(SP)          // argc放在栈顶
    MOVQ	24(SP), AX         // copy argv; AX=argv
    MOVQ	AX, 8(SP)          // argv放在SP+8的位置
    CALL	runtime·args(SB)
    CALL	runtime·osinit(SB) // 全局变量 ncpu = CPU核数
    CALL	runtime·schedinit(SB)
//...
// 4.创建main goroutine
//...
// 5.开始M
// ...
schedinit #
schedinit主要也是进行一些初始化工作, 设置M的最大个数,P的个数(优先设置为环境变量GOMAXPROCS,如环境变量不存在就设置为系统CPU核数),初始化m0
func schedinit() {
    _g_ := getg()
    //...
    // 最多启动10000个操作系统线程,也是最多10000个M
    sched.maxmcount = 10000
    //...
    //初始化m0,因为从前面的代码我们知道g0->m = &m0
    mcommoninit(_g_.m)
    //...
    //系统中有多少核,就创建和初始化多少个p结构体对象
    procs := ncpu
    if n, ok := atoi32(gogetenv("GOMAXPROCS")); ok && n > 0 {
        //如果指定了GOMAXPROCS大于0,则创建指定数量的p
        procs = n
    }
    if procresize(procs) != nil {
        throw("unknown runnable goroutine during bootstrap")
    }
    //...
}
getg函数在源代码中没有对应的定义,由编译器插入类似下面两行代码
get_tls(CX)     // CX=TLS
MOVQ g(CX), BX; // BX存器里面现在放的是当前g结构体对象的地址
mcommoninit #
mcommoninit主要是判断m是否超过个数,然后放入全局m链表,防止垃圾回收
func mcommoninit(mp *m) {
    _g_ := getg()
    //...
    lock(&sched.lock)
    if sched.mnext+1 < sched.mnext {
   	    throw("runtime: thread ID overflow")
    }
    mp.id = sched.mnext
    sched.mnext++
    //检查m的个数是否超过sched.maxmcoun
    checkmcount()
    //...
    //m放入全局链表allm, 防止垃圾回收
    mp.alllink = allm
    //...
}
procresize #
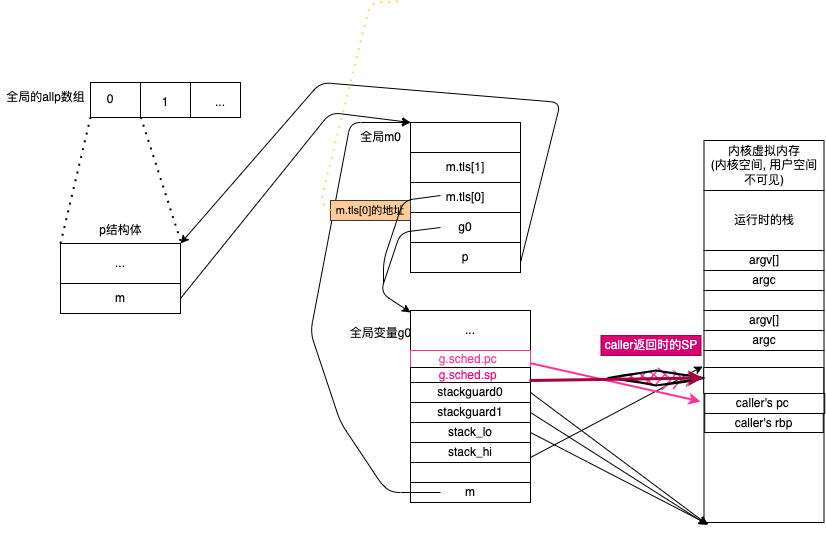
procresize函数,主要有两个作用,一个是初始化allp,另一个是把m0和allp[0]进行绑定。
注意:后续用户代码仍可调用
GOMAXPROCS()函数来再次创建和初始化p结构体对象
初始化
allp:- 使用
make([]*p, nprocs)创建一个新的切片nallp,它的容量为nprocs。 - 将旧的
allp内容复制到新的nallp中。 - 更新
allp为新的nallp。
- 使用
初始化和创建 P:
- 遍历
allp切片中的每个元素。 - 如果元素为
nil,则创建一个新的p。 - 对每个
p(无论是新的还是旧的)进行初始化。
- 遍历
绑定
m0和allp[0]:- 将初始机器
m0与allp[0]绑定,即设置m0.p = allp[0]和allp[0].m = m0。 - 这意味着
m0将使用allp[0]作为其处理器上下文。
- 将初始机器
管理空闲 P:
- 将除了
allp[0]之外的所有p放入全局调度器变量sched的pidle空闲队列中。 - 这使得这些
p可以在需要时被分配给其他机器(M)使用。
- 将除了
这些步骤确保了 Go 运行时能够有效地管理处理器上下文(P),并通过将空闲的 P 放入队列来优化资源利用。这样设计的目的是为了在多核环境中高效调度 goroutine,最大化并发执行能力。
func procresize(nprocs int32) *p {
    //...
    // 调整 allp 切片
    // 1. 如果新的处理器数量大于当前 allp 的长度,函数首先加锁以确保线程安全。
    // 2. 如果 nprocs 在 allp 的容量范围内,则仅调整切片的长度。
    // 3. 否则,创建一个新的切片 nallp,将旧的 P 复制过来,并更新 allp。
    if nprocs > int32(len(allp)) { //初始化时 len(allp) == 0
        lock(&allpLock)
        if nprocs <= int32(cap(allp)) {
            allp = allp[:nprocs]
        } else { //初始化时进入此分支,创建allp 切片
            nallp := make([]*p, nprocs)
            copy(nallp, allp[:cap(allp)]) //把旧的allp拷贝到新的nallp里面
            allp = nallp
        }
        unlock(&allpLock)
    }
    // 初始化新的P(为新增加的 P 进行初始化。如果某个位置的 P 是 nil,则创建一个新的 P 并进行初始化)
    for i := old; i < nprocs; i++ {
        pp := allp[i]
        if pp == nil {
            pp = new(p)
        }
        pp.init(i) //每个p然后进行初始化 旧的也需要重新进行初始化
        atomicstorep(unsafe.Pointer(&allp[i]), unsafe.Pointer(pp))
    }
    //...
    // 将 P 与当前 M 关联:
    // 1. 获取当前的 goroutine _g_。
    // 2. 如果当前 M 已经有一个有效的 P,并且其 ID 在新的 P 数量范围内,则继续使用当前的 P。
    // 3. 否则,释放当前 P,并获取 allp[0],将其与当前 M 关联。
    _g_ := getg()  // _g_ = g0
    if _g_.m.p != 0 && _g_.m.p.ptr().id < nprocs {//初始化时m0->p还未初始化,所以不会执行这个分支
        // continue to use the current P
        _g_.m.p.ptr().status = _Prunning
        _g_.m.p.ptr().mcache.prepareForSweep()
    } else {//初始化时执行这个分支
        // release the current P and acquire allp[0]
        if _g_.m.p != 0 {//初始化时这里不执行
            _g_.m.p.ptr().m = 0
        }
        _g_.m.p = 0
        _g_.m.mcache = nil
        p := allp[0]
        p.m = 0
        p.status = _Pidle
        acquirep(p) // --> Associate p and the current m; 在初始化的时候就是把p和m0关联起来,其实是这两个strct的成员相互赋值
        if trace.enabled {
            traceGoStart()
        }
    }
    // 释放未使用的 P 的资源 (如果新的 P 数量小于旧的数量,释放未使用的 P)
    for i := nprocs; i < old; i++ {
        p := allp[i]
        p.destroy()
        // TODO zxc can't free P itself because it can be referenced by an M in syscall
    }
    //理空闲的P:
    // 1. 将所有空闲的 P 放入空闲链表中,但不包括 allp[0],因为它已经与 m0 关联。
    // 2. 这个循环从 nprocs - 1 开始向下遍历,确保空闲的 P 被正确管理。
    var runnablePs *p
    for i := nprocs - 1; i >= 0; i-- {
        p := allp[i]
        if _g_.m.p.ptr() == p {//不放allp[0],因为它跟m0在上面已经关联了
            continue
        }
        p.status = _Pidle
        if runqempty(p) {//初始化时除了allp[0]其它p全部执行这个分支,放入空闲链表
            pidleput(p)
        } else {
            //...
        }
    }
    //...
    return runnablePs
}
3.4.创建main goroutine #
创建运行runtime·mainPC函数的goroutine
TEXT runtime·rt0_go(SB),NOSPLIT,$0
//...
// 1.初始化全局变量g0
//...
// 2.m0和g0绑定在一起
//...
// 3.设置nCPU/M/P的个数,初始化m0,allp
//...
// 4.创建main goroutine
    MOVQ	$runtime·mainPC(SB), AX // 创造新goroutine
    PUSHQ	AX
    PUSHQ	$0 # arg size
    CALL	runtime·newproc(SB)
    POPQ	AX
// 5.开始M
// ...

newproc #
这段注释描述了 newproc1 函数的核心功能,即创建一个新的 Goroutine(简称 g),该 Goroutine 将运行指定的函数 fn,并携带指定的参数。
创建新的 Goroutine:
newproc1函数的主要功能是创建一个新的 Goroutine。- 这个 Goroutine 会执行由
fn指定的函数。
参数处理:
narg指定了参数的字节数。- 参数从
argp指定的指针位置开始读取。 - 这些参数会被拷贝到新 Goroutine 的栈中,以便函数
fn可以使用它们。
Goroutine 状态初始化:
- 在
newproc1中,新 Goroutine 的状态最初是_Gdead,然后被初始化为_Grunnable,表示它已经准备好运行。
- 在
调度准备:
- 新创建的 Goroutine 被放入等待运行的队列中。这通常是运行时的调度器使用的一个队列。
- 当调度器选择运行这个 Goroutine 时,它将开始执行
fn。
// newproc 创建一个新的g运行的fn,参数的字节数从argp开始;
// siz: 参数的大小
// callergp: 调用者的goroutine pointer[caller-callee]
// callerpc: 调用者的程序计数器
func newproc(siz int32, fn *funcval) {
    argp := add(unsafe.Pointer(&fn), sys.PtrSize)
    gp := getg()
    pc := getcallerpc()   // getcallerpc:返回其调用者的程序计数器(PC)---getcallersp返回其调用者的堆栈指针(SP)
    systemstack(func() {  // systemstack 切到g0的栈和CPU寄存器去执行, 执行完了, 再切换原来的栈和CPU寄存器
        newproc1(fn, (*uint8)(argp), siz, gp, pc)
    })
}

func newproc1(fn *funcval, argp *uint8, narg int32, callergp *g, callerpc uintptr) {
    //...
    // 获取或创建 G:
    //   尝试从 P 的本地队列或全局队列获取一个空闲的 G。
    //   如果没有可用的 G,则在堆上创建一个新的 G,并将其状态设置为 _Gdead。这阻止了垃圾收集器在 G 初始化完成之前扫描其栈。
    //   将新创建的 G 添加到全局的 allgs 列表。
    _p_ := _g_.m.p.ptr()       // 的到m上的p,在这里就是allp[0]
    newg := gfget(_p_)         // 从本地或者全局队列尝试获取g
    if newg == nil {           // 如果获取失败就构造一个g
        newg = malg(_StackMin) // 跳转到g0的栈,然后再堆上分配,
        casgstatus(newg, _Gidle, _Gdead) //_Gidle=iota //0 新创建的默认是0,所以就是idle;修改状态为Gdead,这样gc就是扫描newg上面的栈,来尝试要不要回收.
        allgadd(newg)          // 这里的把生成的g放入全局allgs []*g//保存所有的g
    }
//...
	memclrNoHeapPointers(unsafe.Pointer(&newg.sched), unsafe.Sizeof(newg.sched)) //newg.sched 空间置零
	newg.sched.sp = sp
	newg.stktopsp = sp
	newg.sched.pc = funcPC(goexit) + sys.PCQuantum // +PCQuantum=1 so that previous instruction is in same function
	newg.sched.g = guintptr(unsafe.Pointer(newg))
    gostartcallfn(&newg.sched, fn)

    // 设置调用信息:保存调用者的 PC 和祖先信息。
 .  // 更改状态:将 newg 的状态从 _Gdead 改为 _Grunnable,表示它已准备好运行。
    // 分配 Goroutine ID:从 goidcache 中获取一个新的 ID 分配给 newg。
    newg.gopc = callerpc
    newg.ancestors = saveAncestors(callergp)
    newg.startpc = fn.fn
    //...
    casgstatus(newg, _Gdead, _Grunnable) //修改goroutine状态
    if _p_.goidcache == _p_.goidcacheend {
    	_p_.goidcache = atomic.Xadd64(&sched.goidgen, _GoidCacheBatch)
    	_p_.goidcache -= _GoidCacheBatch - 1
    	_p_.goidcacheend = _p_.goidcache + _GoidCacheBatch
    }
    newg.goid = int64(_p_.goidcache)
    _p_.goidcache++

    // 放入调度队列
    runqput(_p_, newg, true) //放入本地队列, 或者全局队列
    //...
}
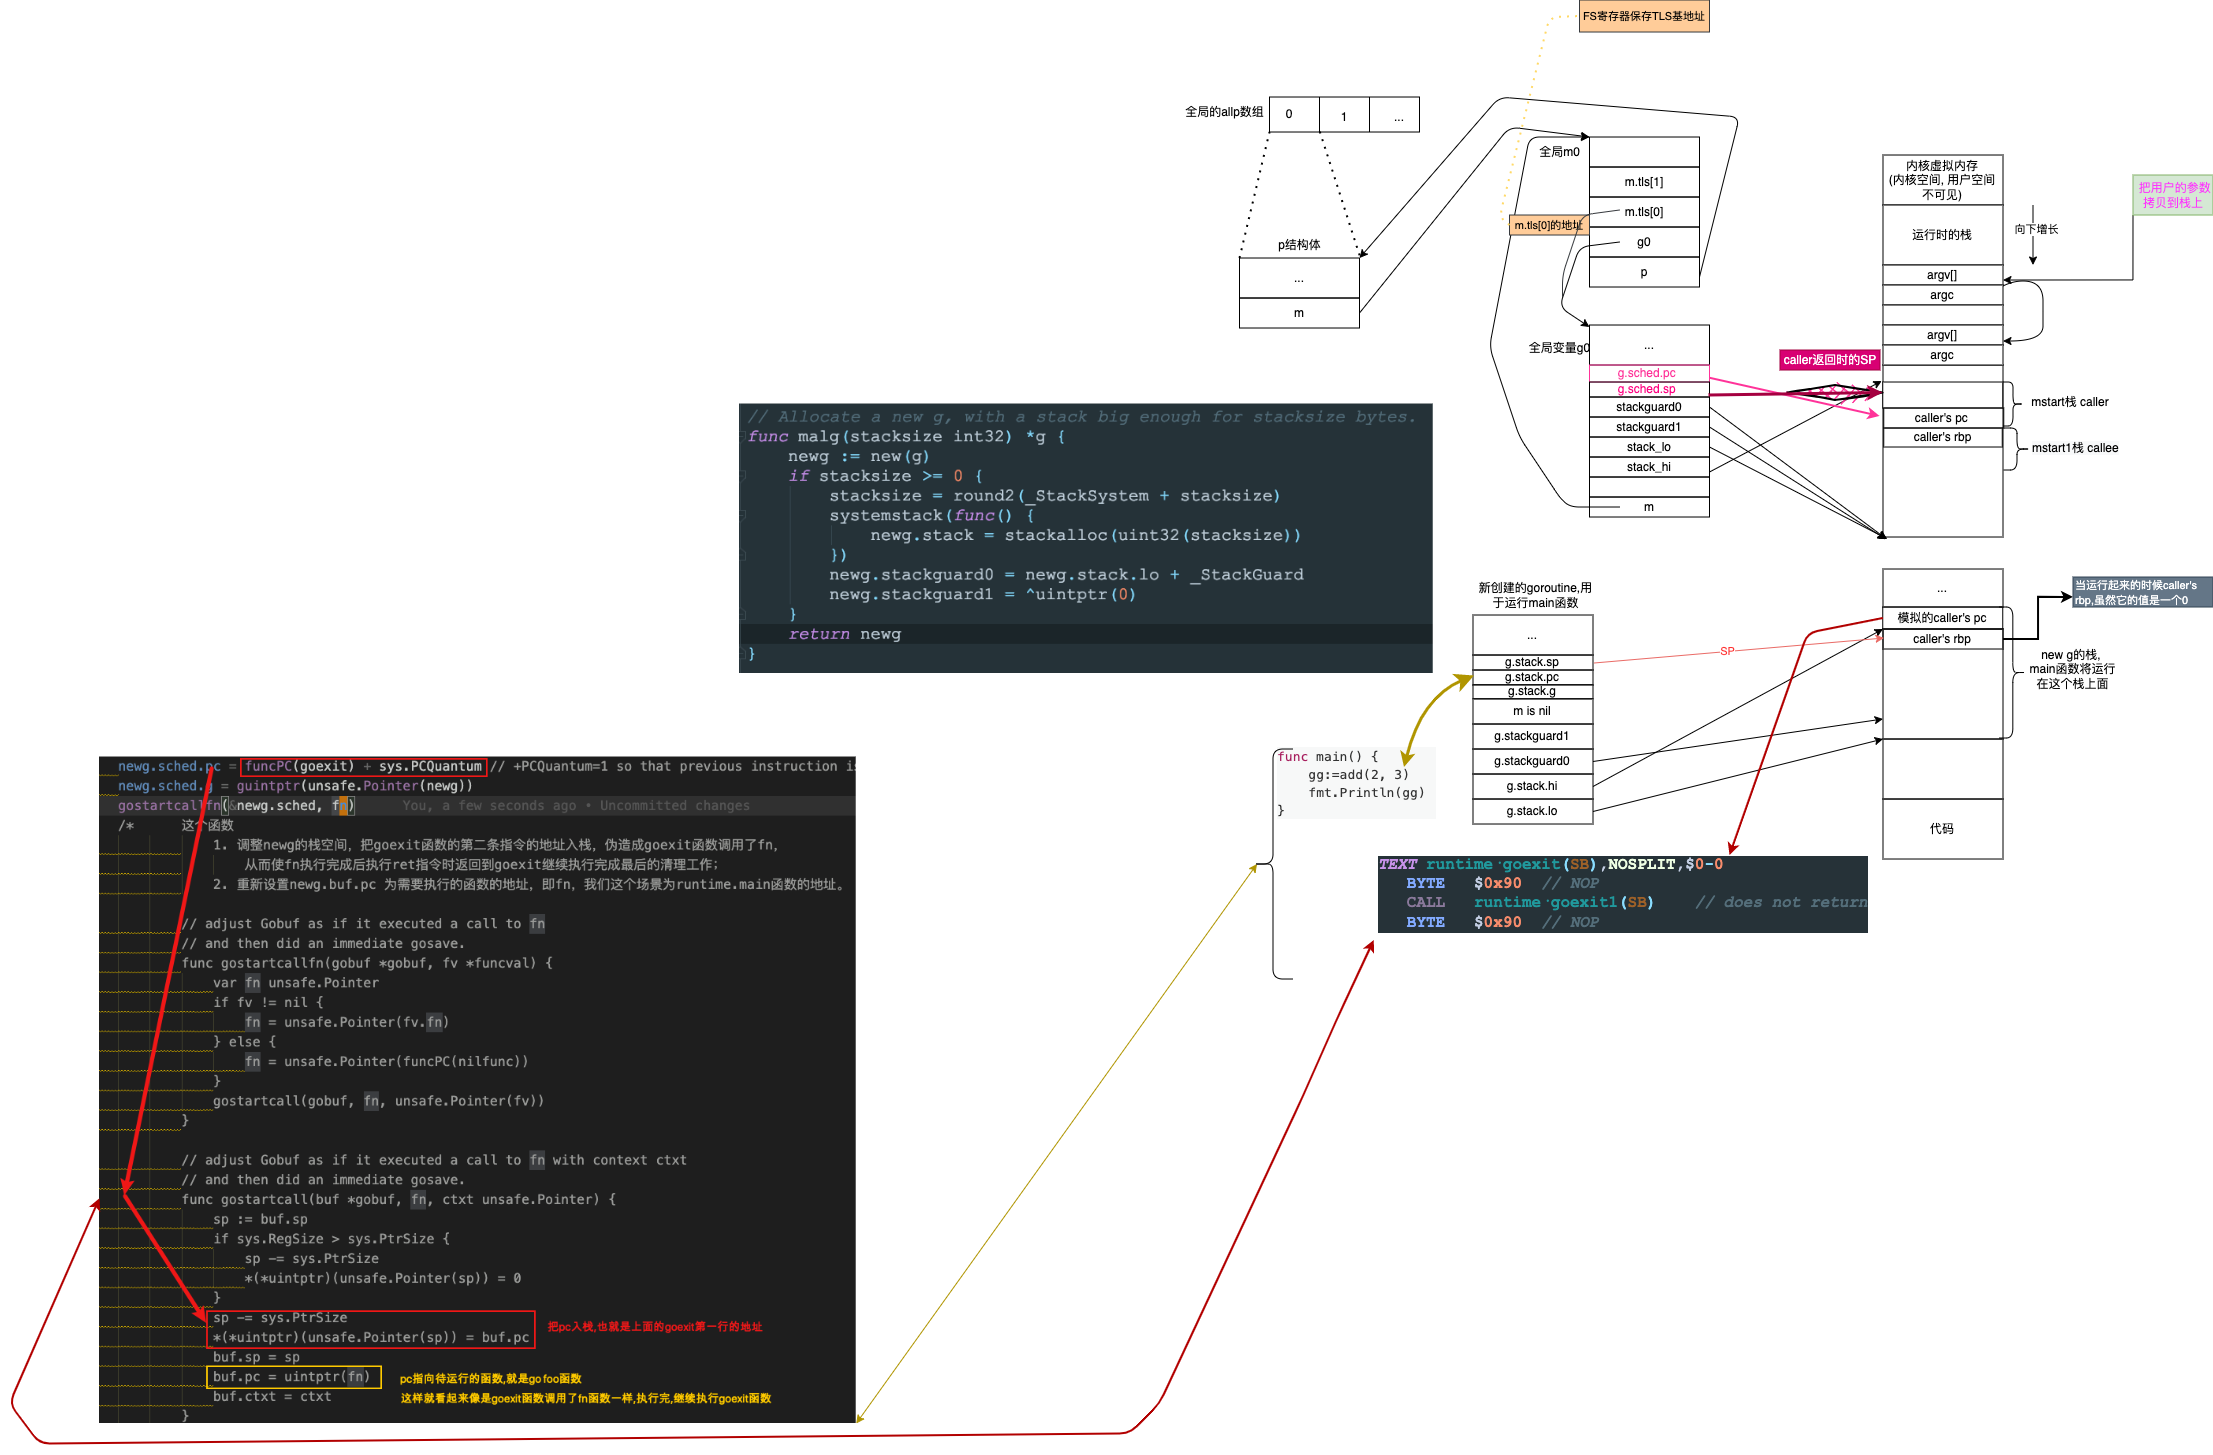
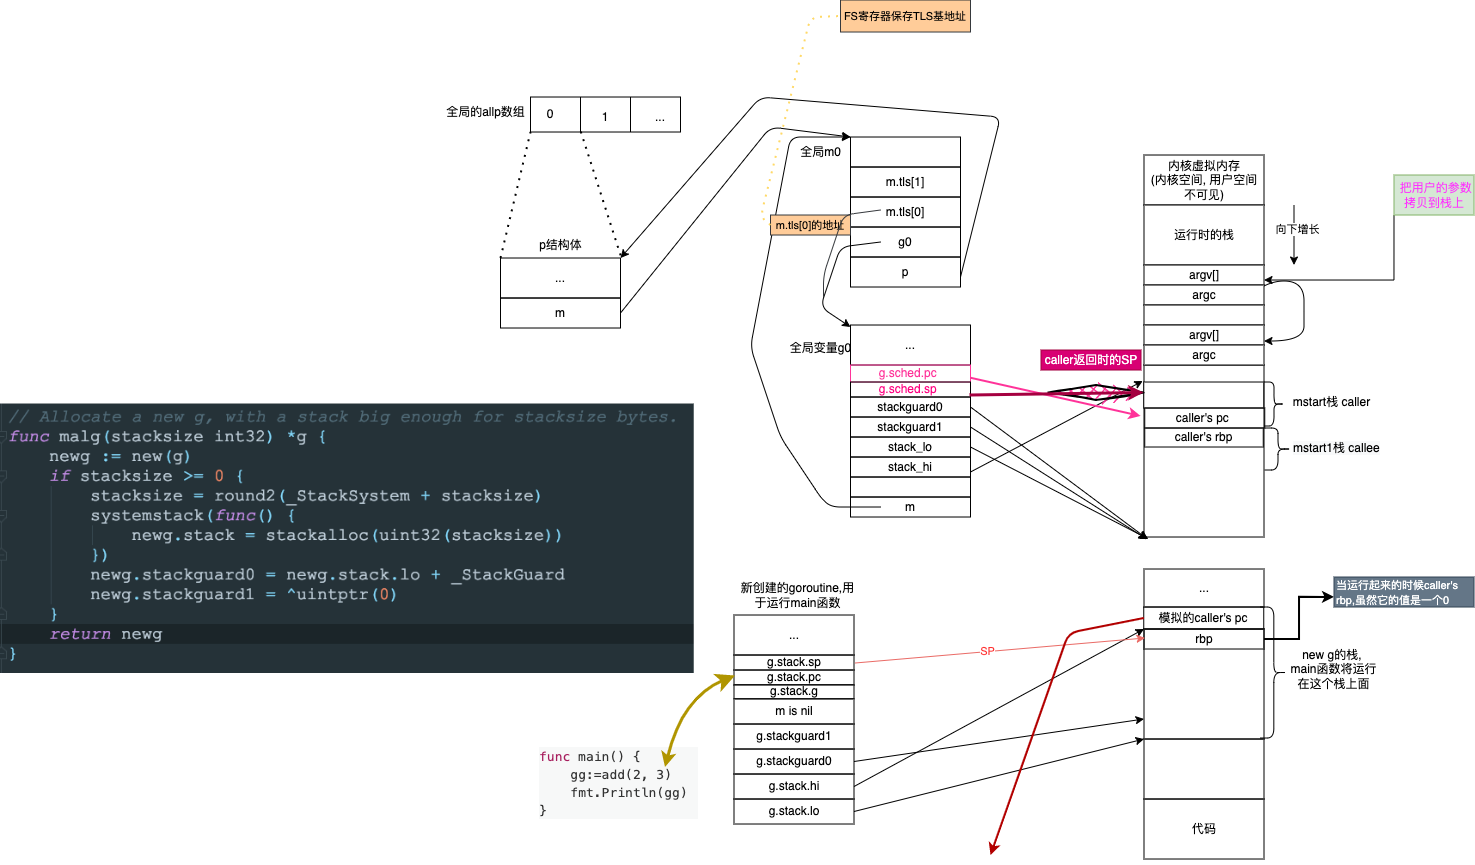
- 调整newg的栈空间,把goexit函数的第二条指令的地址入栈,伪造成goexit函数调用了fn,从而使fn执行完成后执行ret指令时返回到goexit继续执行完成最后的清理工作
- 重新设置newg.buf.pc 为需要执行的函数的地址,即fn,我们这个场景为runtime.main函数的地址。
func gostartcallfn(gobuf *gobuf, fv *funcval) {
    var fn unsafe.Pointer
    if fv != nil {
        fn = unsafe.Pointer(fv.fn)
    } else {
        fn = unsafe.Pointer(funcPC(nilfunc))
    }
    gostartcall(gobuf, fn, unsafe.Pointer(fv))
}
    func gostartcall(buf *gobuf, fn, ctxt unsafe.Pointer) {
        sp := buf.sp
        if sys.RegSize > sys.PtrSize {
            sp -= sys.PtrSize
            *(*uintptr)(unsafe.Pointer(sp)) = 0
        }
        sp -= sys.PtrSize
        *(*uintptr)(unsafe.Pointer(sp)) = buf.pc
        buf.sp = sp
        buf.pc = uintptr(fn)
        buf.ctxt = ctxt
    }
rbp这个寄存器的值还有用? #
从上面的图中都没有说rbp这个寄存器,它不会保存到新创建的g内的sched.bp字段, 当重新调度这个g,重新观察BP寄存器这一章中我们会看到里面是空的
type g struct {
	stack       stack   // offset known to runtime/cgo
	stackguard0 uintptr // offset known to liblink
	stackguard1 uintptr // offset known to liblink

	_panic         *_panic // innermost panic - offset known to liblink
	_defer         *_defer // innermost defer
	m              *m      // current m; offset known to arm liblink
	sched          gobuf
	//...
}

type gobuf struct {
	sp   uintptr
	pc   uintptr
	g    guintptr
	ctxt unsafe.Pointer
	ret  sys.Uintreg
	lr   uintptr
	bp   uintptr // for GOEXPERIMENT=framepointer   ------------------------here
}
3.5.开始M #
我们继续下面的 runtime·rt0_go函数.
TEXT runtime·rt0_go(SB),NOSPLIT,$0
//...
// 1.初始化全局变量g0
//...
// 2.m0和g0绑定在一起
//...
// 3.设置nCPU/M/P的个数,初始化m0,allp
//...
// 4.创建main goroutine
//...
// 5.开始M
    CALL	runtime·mstart(SB) // start this M
    CALL	runtime·abort(SB)  // mstart should never return
    RET
    // Prevent dead-code elimination of debugCallV1, which is
    // intended to be called by debuggers.
    MOVQ	$runtime·debugCallV1(SB), AX
    RET
mstart #
mstart 是一个新M切入点, 它主要是再检查下此M对应g0栈是否有创建,设置一下g0的stackguard0.
// mstart is the entry-point for new Ms.
//
// This must not split the stack because we may not even have stack
// bounds set up yet.
//
// May run during STW (because it doesn't have a P yet), so write
// barriers are not allowed.
//
//go:nosplit
//go:nowritebarrierrec
func mstart() {
	_g_ := getg()  // g0

	osStack := _g_.stack.lo == 0
	/*  ? linux的话, 从runtime·rt0_go我们知道,g0的stack.lo,不是为0的.
		// create istack out of the given (operating system) stack.
		// _cgo_init may update stackguard.
		MOVQ	$runtime·g0(SB), DI
		LEAQ	(-64*1024+104)(SP), BX
		MOVQ	BX, g_stackguard0(DI)
		MOVQ	BX, g_stackguard1(DI)
		MOVQ	BX, (g_stack+stack_lo)(DI)
		MOVQ	SP, (g_stack+stack_hi)(DI)
	*/
	if osStack {
		// Initialize stack bounds from system stack.
		// Cgo may have left stack size in stack.hi.
		// minit may update the stack bounds.
		size := _g_.stack.hi
		if size == 0 {
			size = 8192 * sys.StackGuardMultiplier
		}
		_g_.stack.hi = uintptr(noescape(unsafe.Pointer(&size)))
		_g_.stack.lo = _g_.stack.hi - size + 1024
	}
	// Initialize stack guard so that we can start calling regular
	// Go code.
	_g_.stackguard0 = _g_.stack.lo + _StackGuard  //这个stackguard0比stack.lo大,防止越界
	// This is the g0, so we can also call go:systemstack
	// functions, which check stackguard1.
	_g_.stackguard1 = _g_.stackguard0 //stackguard1的作用是栈溢出检查,如果是stackguard0与stackguard1相等,那么是不能放数据到g0栈中了吗
	mstart1()

	// Exit this thread.
	if GOOS == "windows" || GOOS == "solaris" || GOOS == "illumos" || GOOS == "plan9" || GOOS == "darwin" || GOOS == "aix" {
		// Windows, Solaris, illumos, Darwin, AIX and Plan 9 always system-allocate
		// the stack, but put it in _g_.stack before mstart,
		// so the logic above hasn't set osStack yet.
		osStack = true
	}
	mexit(osStack)
}
mstart1 #
重置一下g0的pc/sp为caller的pc/sp, 而mstart1的caller就是mstart
记录调用者,以便在mcall中作为堆栈顶部使用,并用于终止线程。 我们在调用schedule之后就不会再回到mstart1,所以其他调用可以重复使用当前的帧。
func mstart1() {
	_g_ := getg()   //g0

	if _g_ != _g_.m.g0 {
		throw("bad runtime·mstart")
	}

	// Record the caller for use as the top of stack in mcall and
	// for terminating the thread.
	// We're never coming back to mstart1 after we call schedule,
	// so other calls can reuse the current frame.
	save(getcallerpc(), getcallersp()) //就是把pc, sp保存到自己的sched里面, 但是bp寄存器没有保存,因为会重新使用这个栈?
	/*
	这里不是当前的, 因为后面调用schedule函数后,还会再回到mstart1函数,但是永远不会进入到mstart函数
		getcallerpc()返回的是mstart调用mstart1时被call指令压栈的返回地址, bp+1 ?
		getcallersp()函数返回的是调用mstart1函数之前mstart函数的栈顶地址    bp ?
	*/
	asminit()
	minit() //初始化信号

	// Install signal handlers; after minit so that minit can
	// prepare the thread to be able to handle the signals.
	// 安装信号处理程序;所以minit可以准备线程以便能够处理信号, 在minit之后执行
	if _g_.m == &m0 {
		mstartm0()
	}

	if fn := _g_.m.mstartfn; fn != nil {   //如果m的mstartfn不是空的,先执行它
		fn()
	}

	if _g_.m != &m0 { // 如果m不等于m0  就是m0的话,前面m0和allp[0]已经绑定了
		acquirep(_g_.m.nextp.ptr()) //TODO zxc 这个acquirep函数是把m和m.nextp进行绑定,如果到这里的时候,nextp已经状态不是空闲的状态,
		                            //那么会抛出错误?
		_g_.m.nextp = 0
	}
	schedule() //进入调度
}
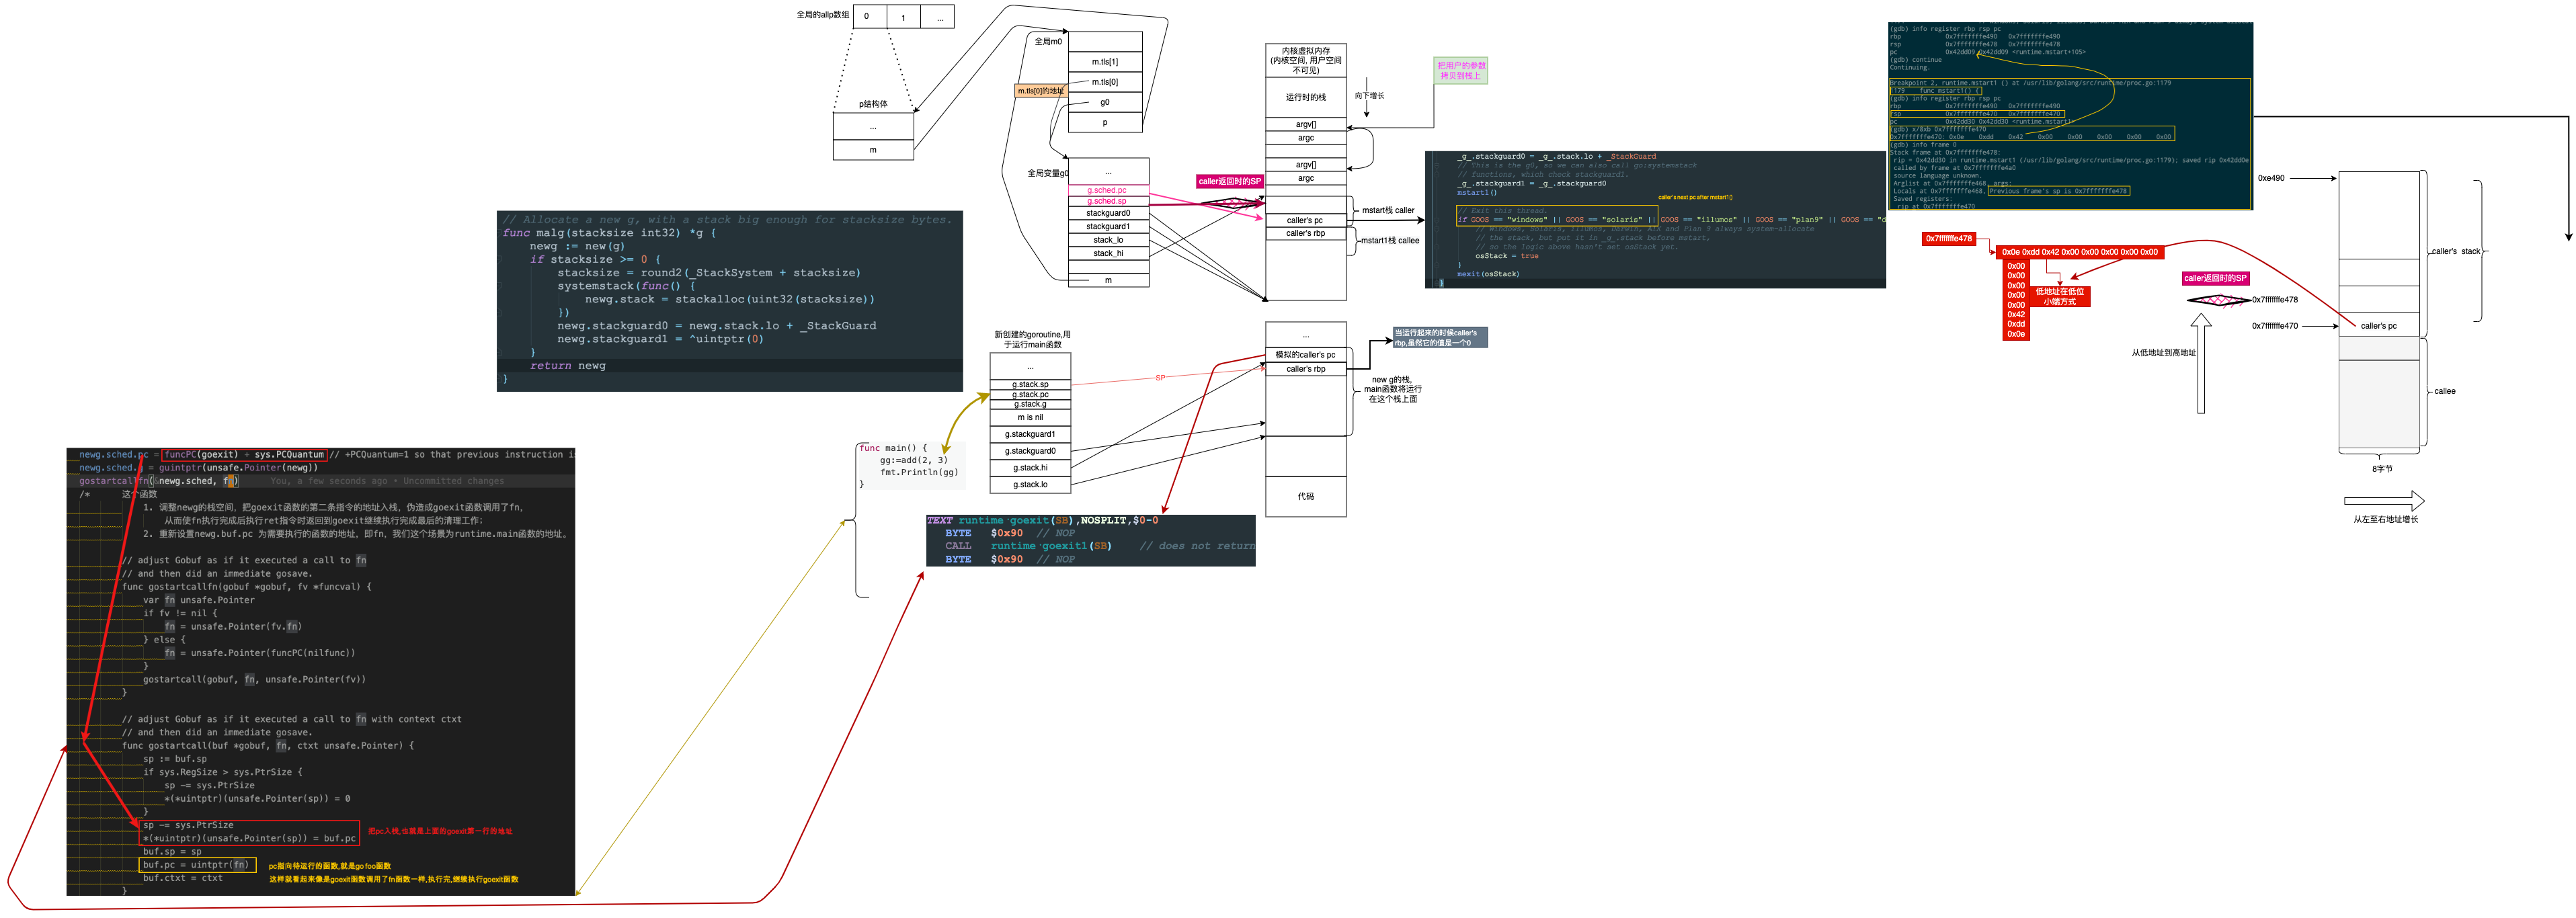
保存pc,sp到g0 #
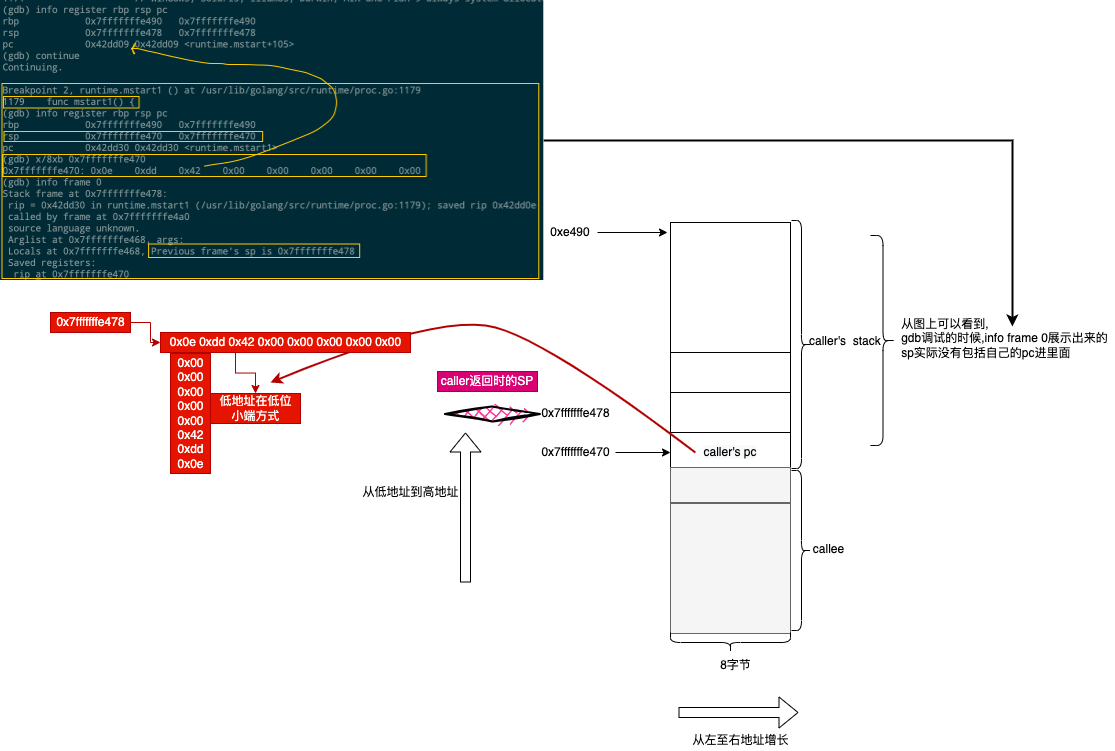
save函数保存pc,sp到g0,方便下次再度调度运行g0
反汇编mstart1到save #
反汇编mstart1到save函数的汇编代码
schedule函数 #
schedule函数:死循环的查找可运行的goroutine,然后执行它.
// One round of scheduler: find a runnable goroutine and execute it.
// Never returns.
func schedule() {
	_g_ := getg() // get g0

	//....

top:
	//...

	var gp *g
	var inheritTime bool

	// Normal goroutines will check for need to wakeP in ready,
	// but GCworkers and tracereaders will not, so the check must
	// be done here instead.
	tryWakeP := false //一般的goroutines会在准备好的时候检查是否需要wakeP。gcworker, tracereaders需要现在唤醒P.
	if trace.enabled || trace.shutdown {
		gp = traceReader()
		if gp != nil {
			casgstatus(gp, _Gwaiting, _Grunnable)
			traceGoUnpark(gp, 0)
			tryWakeP = true
		}
	}
	if gp == nil && gcBlackenEnabled != 0 {
		gp = gcController.findRunnableGCWorker(_g_.m.p.ptr())
		tryWakeP = tryWakeP || gp != nil
	}
	if gp == nil {
		// Check the global runnable queue once in a while to ensure fairness.
		// Otherwise two goroutines can completely occupy the local runqueue
		// by constantly respawning each other.
		if _g_.m.p.ptr().schedtick%61 == 0 && sched.runqsize > 0 {
			lock(&sched.lock)
			gp = globrunqget(_g_.m.p.ptr(), 1)
			unlock(&sched.lock)
		}
	}
	if gp == nil {
		gp, inheritTime = runqget(_g_.m.p.ptr())
		if gp != nil && _g_.m.spinning {
			throw("schedule: spinning with local work")
		}
	}
	if gp == nil {
		gp, inheritTime = findrunnable() // blocks until work is available
	}

	// This thread is going to run a goroutine and is not spinning anymore,
	// so if it was marked as spinning we need to reset it now and potentially
	// start a new spinning M.
	if _g_.m.spinning {
		resetspinning()
	}

	if sched.disable.user && !schedEnabled(gp) {
		// Scheduling of this goroutine is disabled. Put it on
		// the list of pending runnable goroutines for when we
		// re-enable user scheduling and look again.
		lock(&sched.lock)
		if schedEnabled(gp) {
			// Something re-enabled scheduling while we
			// were acquiring the lock.
			unlock(&sched.lock)
		} else {
			sched.disable.runnable.pushBack(gp)
			sched.disable.n++
			unlock(&sched.lock)
			goto top
		}
	}

	// If about to schedule a not-normal goroutine (a GCworker or tracereader),
	// wake a P if there is one.
	if tryWakeP { //a GCworker or tracereader,需要唤醒P
		if atomic.Load(&sched.npidle) != 0 && atomic.Load(&sched.nmspinning) == 0 {
			wakep()
		}
	}
	//...

	execute(gp, inheritTime) // 执行G
}
schedule()函数主要是获取一个Goroutine.
- 调用
globrunqget()和runqget()函数分别从全局运行队列和当前工作线程的本地运行队列中选取下一个需要运行的goroutine; - 如果这两个队列都没有需要运行的goroutine则通过
findrunnable()函数从其它p的运行队列中盗取goroutine.
- 调用
一旦找到下一个需要运行的goroutine,则调用excute函数从g0切换到该goroutine去运行.
- 否则一直阻塞在findrunnable上面(
gp, inheritTime = findrunnable() // blocks until work is available)
- 否则一直阻塞在findrunnable上面(
execute函数 #
// Schedules gp to run on the current M.
// If inheritTime is true, gp inherits the remaining time in the
// current time slice. Otherwise, it starts a new time slice.
// Never returns.
//
// Write barriers are allowed because this is called immediately after
// acquiring a P in several places.
//
//go:yeswritebarrierrec

func execute(gp *g, inheritTime bool) {
	_g_ := getg() // g0

	casgstatus(gp, _Grunnable, _Grunning) //修改将要运行的gp的状态.
	gp.waitsince = 0
	gp.preempt = false //抢占标志位
	gp.stackguard0 = gp.stack.lo + _StackGuard //设置栈顶的保护,比栈地址的最低位高点,防止栈越界
	if !inheritTime {
		_g_.m.p.ptr().schedtick++
	}
	_g_.m.curg = gp //这里就开始设置M的curg为gp,而不是g0了
	gp.m = _g_.m  // m.curg = gp and gp.m = m

	//...
	gogo(&gp.sched)
}
execute函数主要为将要被调度运行的gorouine的g设置状态,与M相互关联
gogo #
gogo把将要运行的main函数的goroutine从gobuf中取出到寄存器中,同时把gobuf清0,有助于垃圾回收.
# list /usr/lib/golang/src/runtime/proc.go:2165
# gdb查看发现又到了asm_amd64.s文件
(gdb) step
runtime.gogo () at /usr/lib/golang/src/runtime/asm_amd64.s:272
272	TEXT runtime·gogo(SB), NOSPLIT, $16-8
(gdb) list
# func gogo(buf *gobuf)
# restore state from Gobuf; longjmp
TEXT runtime·gogo(SB), NOSPLIT, $16-8
	MOVQ	buf+0(FP), BX		# gobuf
	MOVQ	gobuf_g(BX), DX
	MOVQ	0(DX), CX		# make sure g != nil //防止g.gobuf.g里面的值是空的,空的取地址会panic
	get_tls(CX)
	MOVQ	DX, g(CX)
	MOVQ	gobuf_sp(BX), SP	# restore SP
	MOVQ	gobuf_ret(BX), AX
	MOVQ	gobuf_ctxt(BX), DX
	MOVQ	gobuf_bp(BX), BP
	MOVQ	$0, gobuf_sp(BX)	# clear to help garbage collector
	MOVQ	$0, gobuf_ret(BX)
	MOVQ	$0, gobuf_ctxt(BX)
	MOVQ	$0, gobuf_bp(BX)
	MOVQ	gobuf_pc(BX), BX
	JMP	BX
从下面的跳转语句,可知它将跳到前面创建main goroutine时定义的(runtime·mainPC(SB))函数中去了
    #...
	MOVQ	gobuf_pc(BX), BX
	JMP	BX
重新观察BP寄存器 #
当调度这个main函数的goroutine,从g.sched中恢复的寄存器的值,其中恢复后BP寄存器的值就是0
4.进入main函数 #
断点到这个函数,然后查看它前几个汇编代码:
(gdb) list /usr/lib/golang/src/runtime/proc.go:113
// list /usr/lib/golang/src/runtime/proc.go:113

108
109	// Value to use for signal mask for newly created M's.
110	var initSigmask sigset
111
112	// The main goroutine.
113	func main() {
114		g := getg()
115
116		// Racectx of m0->g0 is used only as the parent of the main goroutine.
117		// It must not be used for anything else.
(gdb) b 113
Breakpoint 4 at 0x42aea0: file /usr/lib/golang/src/runtime/proc.go, line 113.
(gdb) c
Continuing.

Breakpoint 4, runtime.main () at /usr/lib/golang/src/runtime/proc.go:113
113	func main() {
(gdb) list
108
109	// Value to use for signal mask for newly created M's.
110	var initSigmask sigset
111
112	// The main goroutine.
113	func main() {
114		g := getg()
115
116		// Racectx of m0->g0 is used only as the parent of the main goroutine.
117		// It must not be used for anything else.
(gdb) info register rbp rsp pc bp sp
rbp            0x0	0x0
rsp            0xc0000307d8	0xc0000307d8
pc             0x42aea0	0x42aea0 <runtime.main>
bp             0x0	0
sp             0xc0000307d8	0xc0000307d8
(gdb) disas
Dump of assembler code for function runtime.main:
=> 0x000000000042aea0 <+0>:	    mov    %fs:0xfffffffffffffff8,%rcx
   0x000000000042aea9 <+9>:	    cmp    0x10(%rcx),%rsp
   0x000000000042aead <+13>:	jbe    0x42b1ea <runtime.main+842>
   0x000000000042aeb3 <+19>:	sub    $0x78,%rsp
   0x000000000042aeb7 <+23>:	mov    %rbp,0x70(%rsp)
   0x000000000042aebc <+28>:	lea    0x70(%rsp),%rbp
   0x000000000042aec1 <+33>:	mov    %fs:0xfffffffffffffff8,%rax
   0x000000000042aeca <+42>:	mov    %rax,0x68(%rsp)
   0x000000000042aecf <+47>:	mov    0x30(%rax),%rcx
   0x000000000042aed3 <+51>:	mov    (%rcx),%rcx
   0x000000000042aed6 <+54>:	movq   $0x0,0x130(%rcx)
   0x000000000042aee1 <+65>:	movq   $0x3b9aca00,0x11e234(%rip)        # 0x549120 <runtime.maxstacksize>
   0x000000000042aeec <+76>:	movb   $0x1,0x14dabc(%rip)        # 0x5789af <runtime.mainStarted>
- 虽然这个rbp是0,是空的,但是还是保存到栈里面去了.
   0x000000000042aeb3 <+19>:	sub    $0x78,%rsp
   0x000000000042aeb7 <+23>:	mov    %rbp,0x70(%rsp)
   0x000000000042aebc <+28>:	lea    0x70(%rsp),%rbp
总结图 #
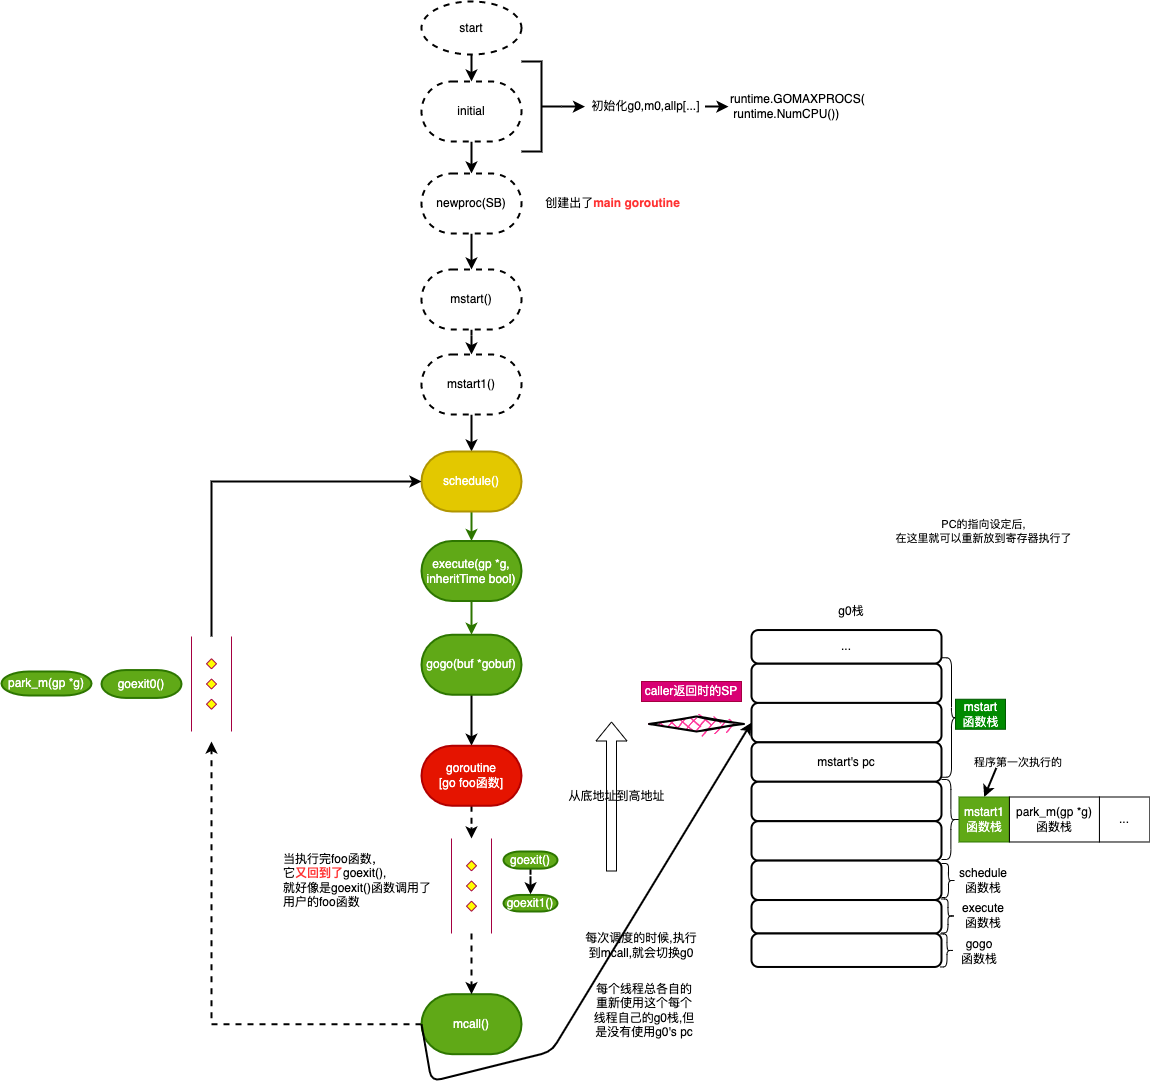
g0栈->刚创建的main Goroutine栈:
- mstart->mstart1->save函数调用链保存g0的调度信息(sp/cp 到 g0.sched对应成员之中)
- schedule函数找可运行状态的Goroutine,这里只有我们刚创建的main Goroutine
- gogo函数从g0栈切换到main Goroutine的栈(使用sched里的值填充到寄存器里去),jmp指定跳转到main Goroutine中g.sched.pc(也就是我们创造main Goroutine时设置的main函数)
- main goroutine运行
已经讲解了图上的上半部分,下节接续